
If you want to take control of your invoicing system, Invoice Ninja Self Hosted White Label is a great choice. It’s like having your own personal invoicing program that you can put on your computer.
White Label is like magic for your invoices. It makes all the Invoice Ninja signs disappear from your invoices and places where your customers see. But if you want to remove all signs completely, there’s a special program called the reseller program.
You might wonder if you lose any cool features by hosting it yourself. Good news, you don’t! You get all the cool stuff that the regular Invoice Ninja has, like Pro and Enterprise features.
Benefits of Using Invoice Ninja Self Hosted White Label
Invoice Ninja Self Hosted White Label is a powerful tool that can greatly benefit your business. Here are some key advantages:
1. Customization
You can tailor the Invoice Ninja Self Hosted White Label software to match your unique business requirements. This means you can personalize it to work exactly the way you want it to.
2. Integration
One of the great features of this platform is its ability to connect with various payment gateways. This integration makes it much easier for your customers to pay you online. It’s all about making your life easier.
3. Automatic Invoice Reminders
Invoice Ninja Self Hosted White Label doesn’t just stop at sending invoices. It also helps you get paid on time by sending automatic reminders. No more chasing down late payments!
4. White Labeling
Want to look super professional? The white-label license offered here removes any mention of Invoice Ninja from your invoices and client-facing areas. Your business gets all the attention.
5. Pro and Enterprise Features
You get all the awesome features that come with the Pro and Enterprise versions of Invoice Ninja. This means you’re not missing out on anything by going self-hosted.
If you’re on the hunt for invoicing and billing software that can be adjusted to suit your specific needs, Invoice Ninja Self Hosted White Label is an excellent choice. It doesn’t just stop at customization; it can also work seamlessly with payment gateways and send automatic reminders for payment. Plus, with white labeling, you can present a more professional image to your clients.
System Requirements
To set up Invoice Ninja Self Hosted White Label, you’ll need two important things: PHP 7.1 or 7.2 and MySQL. These are like the building blocks for the software to work.
How to Install Invoice Ninja Self Hosted White Label
If you want to use Invoice Ninja Self Hosted White Label, you’ll need to follow these steps to get it up and running on your computer:
1. Get the Code
First, you have to get the code for Invoice Ninja. You can do this by going to the Invoice Ninja website or visiting their page on GitHub. It’s like downloading a game or a cool app!
2. Put the Code on Your Computer
After you download the code, you need to put it on your computer. This step is like putting a puzzle piece in its place.
3. Set Up a Special Place for Data
Invoice Ninja needs a special place to store all its information. We call this place a “database.” Think of it like a digital filing cabinet where Invoice Ninja keeps everything organized.
4. Make Your Computer a Host
To use Invoice Ninja, your computer needs to become a host. This step is a bit like your computer becoming a friendly host at a party. It gets the website ready for you to use.
5. Remove the Branding
If you don’t want any labels or marks from Invoice Ninja, you can add something called a “white-label license.” It’s like putting a blank sticker on something to make it look simple and clean.
6. Extra Help if Needed
If you find these steps tricky, don’t worry! You can ask a special developer called “Bold Compass” for help. They’re like tech experts who can make custom changes to Invoice Ninja for you.
7. Customize Your Emails
Once everything is set up, you can make your emails look just the way you want them. There are lots of options to choose from. It’s like decorating your room with your favorite colors and posters.
So, if you follow these steps, you’ll have Invoice Ninja up and running on your computer in no time! Enjoy using it for your business or personal needs.
Read also: Invoice Ninja Windows App: How To Use It
Key Features of Invoice Ninja Self Hosted White Label
The Invoice Ninja Self Hosted White Label has some cool features. Let’s dig deeper into what they are:
1. No More Branding
With the white label license, you can say goodbye to the Invoice Ninja branding. But wait, there’s more! All those fancy pro and enterprise features you find in the regular hosted app? Well, they’re all included in the self-hosted version too.
2. Client Portal and Email Magic
If you’re using the app for your own business stuff, you can make it look like your very own by getting an annual white label license from within the app. You can even give your client portal and emails a makeover.
3. Invoicing, Expenses, and Tasks!
Invoice Ninja has some super useful things like making invoices, keeping track of expenses, and managing tasks. They’ve built it using cool technologies like Laravel, Flutter, and React.
4. Payment Gateway Friends
Getting paid is important, right? Invoice Ninja can team up with payment gateways to make sure you get your money smoothly.
5. Make It Your Own
You’re the boss of your software! Invoice Ninja lets you customize it, and you can even create your own snazzy invoice templates.
6. Community Power
Need help or just want to chat? Invoice Ninja has an awesome community. There’s a forum where you can talk to lots of people, and there’s also a Slack channel where you can join in the conversation with thousands of users.
But remember, the white label license is all about removing branding. It doesn’t give you fancy new pro invoice templates or extra stuff like that. So keep that in mind!
How to Use Invoice Ninja Self-Hosted White Label
If you want to use the Invoice Ninja Self-Hosted White Label, you’ll need to follow these steps:
1. Purchase the License
To get started, buy the white label license right from the application itself. This license is what allows you to customize and brand the software to your liking.
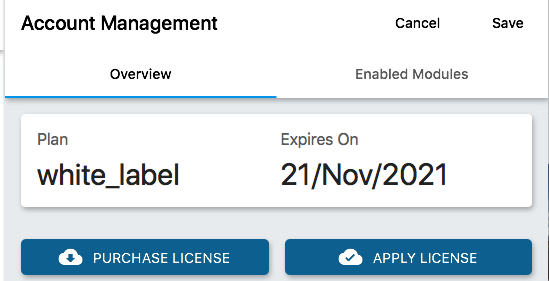
2. Apply the License
After purchasing the license, head over to ‘Settings’ and then click on ‘Account Management.’ Here, you’ll apply the license you just bought. This step is crucial for enabling the white labeling feature.
3. Customize Your Software
Now comes the fun part! Customize the software to match your preferences. You can even tweak the invoice templates to make them suit your style better.
4. Use Invoicing and Billing
With the white label set up, you can start using the invoicing and billing functions. This includes creating invoices, generating quotes, processing payments, and utilizing professional invoice templates.
5. Time Tracking and Project Management
Need to keep tabs on your projects? This software’s got you covered. You can create projects, outline tasks, and keep track of the time you spend on them.
6. Client Management and CRM
Manage your clients effortlessly with the client management and CRM features. Keep an eye on client activity and make use of the client portal. You can even white label your emails for a personalized touch.
7. Reporting and Analytics
Stay on top of your financial game with the reporting and analytics capabilities. Track your revenue, monitor client activity, and review system logs for a complete picture of your business performance.
Read also: Add Language To Invoice Ninja: Boost Business with Multilingual Invoicing
Tips for Maximizing Efficiency and Productivity
1. Choose a Good Hosting Provider
To start off, it’s important to pick a hosting provider that’s reliable. Invoice Ninja has recommendations on their website, so it’s wise to check those out. Look for a hosting provider that meets Invoice Ninja’s system requirements and is known for keeping your website online and offering excellent customer support.
2. Customize Your Software
Don’t forget to personalize the software to suit your needs. Invoice Ninja gives you options to customize things like your invoice templates. This is super handy because it lets you create invoices and other documents that look professional and consistent.
3. Track Your Time and Projects
Invoice Ninja has some cool features that allow you to create projects, tasks, and track your time. This is awesome for staying organized and making sure you charge your clients accurately for the time you spend on their work.
4. Link with Payment Gateways
Make life easier by connecting Invoice Ninja with payment gateways. You can choose the one that works best for your business and set it up in Invoice Ninja. This way, getting paid becomes smoother and more efficient.
5. Use Reporting and Analytics
Invoice Ninja isn’t just for creating invoices. It also offers reporting and analytics features. You can keep an eye on your revenue, track client activity, and even check system logs. These tools help you understand your business better and make smart decisions based on data.
6. Join the Community
There’s a vibrant Invoice Ninja community out there! They have a forum and a Slack channel with lots of users. Joining this community is a great way to learn from others, get help if you run into problems, and share your own experiences.
Read also: Invoice Ninja Hosted vs. Self-Hosted: Which Is Right For You?
Troubleshooting and Support
If you’re having problems with your self-hosted Invoice Ninja, here are some steps you can take to figure out and fix the issues:
1. Check the Logs: First, take a look in the storage/logs directory. This is like a diary where Invoice Ninja writes down any problems it encounters. Look for any error messages or clues about what might be going wrong.
2. Use a Web Cron Service: If you’re not sure what a cron job is, don’t worry. You can use a web cron service that talks to Invoice Ninja through a special door. Think of it like a secret handshake. This helps Invoice Ninja do its regular tasks.
3. Update the .htaccess File: This step is only for folks who use the Apache web server. It’s like giving your webserver a little map to find its way around. Sometimes, if this map is outdated, things can get lost. So, make sure your map is up to date.
4. Check Your Pre-setup Checks: Before you even start using Invoice Ninja, it does some checks to make sure everything is ready. It’s like a car doing a safety check before a long drive. If these checks don’t pass, you might run into issues later. So, make sure all the green lights are on.
White Label Troubleshooting
Now, if you’ve bought the white label license and you’re having trouble with it, here’s what you can do:
1. Invoice Design: Look in the Invoice Design section. This is where you can customize how your invoices look, including the white label part. Check if the white label is working as it should.
2. Finding White Label Settings: Sometimes, after you’ve just installed Invoice Ninja, you might have trouble finding the white label settings. It’s like misplacing your keys in a new house. In this case, check out the Account Management option.
If you need some extra help with Invoice Ninja Self Hosted White Label, here are two options:
1. Join the Community: There’s a community forum and a Slack channel with lots of people who use Invoice Ninja. It’s like a big group chat where you can ask questions and get help from friendly folks who’ve been there before.
2. Contact the Invoice Ninja Team: You can also send an email to [email protected]. They’re the experts behind Invoice Ninja, and they can help you with any tricky issues you might be facing. They’re like the superheroes of Invoice Ninja support!