
Invoice Ninja is a helpful app that lets you create invoices. Did you know that you can add special fields to your invoices to make them just right for your business? But first let’s get a better understanding of how they work.
Custom fields in Invoice Ninja are like special boxes you can add to your invoices, client info, and other parts of the app. Imagine you have a coloring book, and these custom fields are like blank spaces where you can draw or write whatever you want.
1. Adding Extra Info to Invoices
When you create invoices, you might need to add some extra information that’s not in the regular template. You can do this by making your own custom fields. Just go to the Custom Fields section and give your new field a name and a special label, like “Notes” or “Special Instructions.”
2. Custom Fields in Email Templates
You know those emails you send with your invoices attached? Well, you can use your custom fields there too! It’s like having a secret code in your emails. People can see it when they open your invoice.
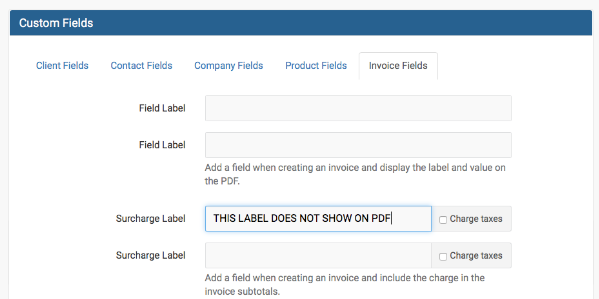
3. Choosing What Shows on the Invoice PDF
You might not want all your custom fields to show up on the final invoice PDF. No worries! You can pick and choose which ones appear. Go to Settings, then Invoice Design, and finally, Invoice Fields. It’s like deciding which pictures to put in your coloring book.
4. Using Custom Fields in Emails
Remember those secret codes? You can use them in your email templates. Just type “$custom1” (or whichever custom field you want) in your email, and Invoice Ninja will fill it in with the right information.
Capture Important Info: Use custom fields to gather crucial data, such as billing periods, payment received dates, or any other info that’s important for your business.
Read also: Invoice Ninja Demo: Unleash Your Business’s Full Potential
Invoice Ninja – How Many Custom Fields Can You Add?
How many fields you can add depends on which version of the app you are using. Let’s find out more!
1. Version 4.x
In this version, you can add as many custom fields as you want to your invoice. That means there’s no limit! You can make your invoice as detailed as you need it to be.
2. Version 5.x
In this newer version, you can add up to four custom fields to your invoice. These fields are there to help you give more information on your invoice. So, you have a bit of freedom to customize it.
But here’s something interesting: some people in the Invoice Ninja community say you might be able to add even more than four custom fields if you know a bit about changing the app’s code. It’s like a secret trick!
Remember, though, how many fields you should add depends on what your business needs. Every business is different.
How to Make Your Own Custom Field in Invoice Ninja
Creating a custom field in Invoice Ninja is like a piece of cake. Here’s the recipe:
1. Go to the admin panel and trot over to Settings > Invoice Design > Customize & Preview.
2. Copy an existing design or make your own and give it a cool name.
Tell Invoice Ninja what you want in your custom fields on the Settings > Invoice Details page.
3. Make sure your custom fields show up on your PDFs by visiting the Invoice Design > Invoice Fields section.
4. If you want to use your new custom field in email templates, just throw in the $custom1 code.
Different Kinds of Custom Fields You Can Cook Up in Invoice Ninja
Invoice Ninja lets you whip up various types of custom fields, such as:
1. Text fields: For typing in words and stuff.
2. Drop-down fields: Like menus where you can pick from a list.
3. Calendar fields: Handy for dates.
4. Time fields: Perfect for tracking hours.
5. Multiple custom fields: When you need more than one custom field at once.
6. Remember, the types of custom fields you can use might change depending on your Invoice Ninja version and your business’s needs.
To get the lowdown on what works best for you, give the official Invoice Ninja documentation a read, reach out to the Invoice Ninja community, or get advice from an Invoice Ninja expert.
How to Remove a Custom Field from an Invoice in Invoice Ninja
If you need to take out a custom field from an invoice using Invoice Ninja, here are the easy steps to do it:
Step 1: Open the Invoice Ninja app and look for the “Custom Fields” section.
Step 2: Once you’re in the “Custom Fields” section, find the specific custom field that you want to get rid of from your invoice.
Step 3: Delete the information or text inside that custom field.
Step 4: Make sure to save the changes you’ve made.
By clearing out the information in the custom field, it should disappear from your invoice.
Customizing Quotes and More in Invoice Ninja
You can make your quotes in Invoice Ninja even more personalized! You know how you can add your name to your schoolwork to make it special? Well, just like that, you can add special things to your quotes in Invoice Ninja too.
Let’s see what you can do:
1. Add Extra Fields
You can add extra fields to not just your quotes, but also to invoices (those are like your official bills), clients (those are the people or companies you’re sending the bills to), and products (that’s the stuff you’re selling).
2. How to Add Fields
The way you add these special fields to your quotes is pretty much the same as how you do it for invoices. It’s like learning to draw a different kind of picture in the same coloring book. You do it in the “Custom Fields” part of the Invoice Ninja app.
3. Different Types
These special fields can be of different types, just like how you have different colors of crayons. You can have text fields (where you write words), number fields (where you put numbers), date fields (where you pick a date), and dropdown fields (where you choose from a list).
4. Required or Not
You can make these special fields mandatory (which means you must fill them out) or just optional (you can leave them empty if you want). It’s like making some questions in a quiz mandatory and others not.
5. Include in Emails
You can also put these special fields in the emails you send. So, when you send your bills, all the extra info can go with them.
6. Hide with CSS
If you want to keep these fields secret in your bill design, you can do that too. It’s like having a secret code that only you can understand.
7. Capture Important Stuff
These special fields help you capture important info, like when someone needs to pay, or when you provide a service. It’s like writing down the date you did your homework.
Read also: The Best In-Depth Analysis of Invoice Ninja Features
Final Thought on Invoice Ninja Custom Fields
Not all Invoice Ninjas are the same. Depending on which version you’re using and what your business needs are, custom fields might work a little differently.
To be sure you’re doing it right, check out the official Invoice Ninja documentation, ask the Invoice Ninja community for help, or talk to an Invoice Ninja pro. They can help you make the best use of your custom fields.
So, with custom fields in Invoice Ninja, you’re not just filling in the blanks. You’re creating your own special coloring book with all the details that matter to you and your business.